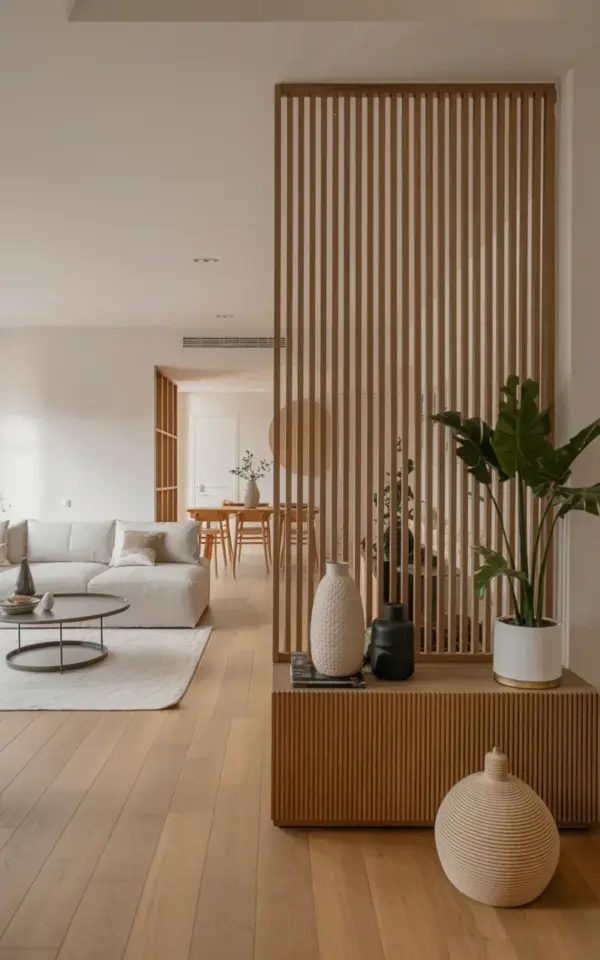
You might be two clicks away from dropping $400 on a wooden room divider that you will probably have to assemble with a tiny Allen wrench anyway. But look, before you do that, here’s the thing: I built mine for under $80. That price difference is not a typo. This slat wall idea gave my living room that expensive, architectural feel while also solving a real layout problem, and it took a Saturday afternoon to finish.
The concept is simple. You build a floor-to-ceiling slat panel that acts as a partial wall, separating the living room from the dining area without blocking all the light. We used plain pinewood and a walnut stain to get that rich, warm brown tone you usually only see in designer catalogs. The best part? The structure is so basic that even a beginner with a drill can handle it.
Why Choose a Slatted Wooden Room Divider Instead of a Solid Wall
A solid wall would have made our small apartment feel like a cave. The slatted design keeps the sightlines open, so the space still feels like one big room, but you get that distinct separation between zones. You get the visual boundary without the claustrophobia.
Plus, the vertical slats draw the eye upward, which makes the ceiling look taller than it actually is. In our apartment, the ceilings are standard 8 feet, nothing special, but the vertical lines create an illusion of height that really changes the atmosphere.
Another overlooked benefit is airflow. If your HVAC vents are on one side of the divider, a solid wall will disrupt the temperature balance completely. The slats let the air move through freely to keep both the living and dining areas comfy.
The Budget Breakdown for This Minimalist Living Room Project
Let me be straight with you about the money because “budget” means different things to different people. Our supply list was embarrassingly short. We spent roughly $60 on pinewood boards, which were the cheap “common board” or “furring strip” options, not the premium clear pine. The walnut stain, a small can, cost around $12. Screws and brackets were maybe $8 more.
Here is the total breakdown:
– **Pinewood slats**: $60 (we needed quite a few for the width)
– **Walnut stain and rags**: $12
– **Wood screws and L-brackets**: $8
– **Total**: $80 (compare that to the $300+ price tag on retail dividers)
Now, the huge savings came from the fact that we didn’t buy a pre-made frame. We attached the slats directly to the existing floor and ceiling using simple metal brackets. It feels permanent, but we can remove the whole thing and patch two drill holes in the ceiling when we move out.
How We Built the DIY Room Divider Step by Step
First, we measured the distance from floor to ceiling precisely. You need the exact height in multiple spots because floors and ceilings are rarely perfectly level. We cut the boards to the longest measurement and then trimmed each one individually to fit its specific spot.
We stained the boards before cutting them to size. I learned that lesson the hard way on a previous project, trying to stain a board that was already mounted in a tight corner. It is a nightmare. Do the prep work on the ground. We applied two coats of walnut stain to the pine and let it dry overnight.
Once dried, we marked the floor and ceiling where our top and bottom plates would go. We screwed a horizontal 2×4 block to the floor and another to the ceiling. Then we simply screwed each vertical slat into those blocks, using a level to make sure the slats weren’t leaning. We spaced them about 2.5 inches apart, which is wide enough to see through but narrow enough to block the visual chaos of the dining table.
Styling the Base and Adding Personal Touches
If you look at the photo, you will see the divider isn’t just sitting there naked on the floor. We built a small wooden base platform at the bottom of the divider. This is basically a low, wide shelf attached to the base of the slats. It gives the whole structure a grounded, heavy feel, like it was designed by an architect.
This shelf became prime real estate for decor. We placed a white textured vase there, which breaks up the brown wood tones nicely. Next to it sits a black container and a spherical white woven basket. The mixture of textures, smooth ceramic and rough woven fiber, is what sells the look. It stops the wood from looking too flat or monotone.
In the photo, you will also notice a large green potted plant with broad leaves sitting in a white ceramic pot on the right side. That plant is doing a lot of heavy lifting. It softens the hard lines of the vertical slats and adds a living, organic element to the space.
Tools You Need to Get This Affordable Decor Done
You do not need a workshop full of fancy equipment. If you have a basic toolbox, you are probably ready to go. Before you start, make sure you have the following:
– A miter saw or circular saw (a hand saw works if you have serious patience)
– A drill with a screwdriver bit
– A level (the longer, the better)
– A stud finder (you need to anchor the top plate to the ceiling joist)
– A tape measure and a pencil
Honestly, the hardest part of the entire project is cutting the slats to the correct length for a slightly crooked ceiling. Measure twice, cut once. If one board ends up a quarter inch too long, just shave it down with a hand plane or a sander. Nobody will notice small imperfections once the stain is on.
Tips for Getting the Slat Spacing Right
The gap between each slat determines whether your room looks like a spa or a prison. We experimented with a few options before settling on our spacing. You want to hold one slat up and step back to look at it from across the room to see how much light gets through.
A good rule of thumb is to keep the gap smaller than the width of the slat itself. If your boards are 3 inches wide, space them 2 to 2.5 inches apart. We used a small piece of scrap wood as a spacer to keep the distances uniform while we were screwing everything up.
It also helps to check the alignment from a specific viewing angle. Stand where your sofa is and look at the divider to see where your eyes land. Align the slats so that from a seated position, the gaps hide the clutter on the dining table but still let you see the window behind it.
Final Thoughts on This Minimalist Living Room Upgrade
Going the DIY route is not just an affordable decor choice; it is a totally different mindset. I hate looking at a room and feeling like I have to buy everything in it. This project let me use materials from the local hardware store to create something that has real substance, and it is built exactly to my measurements.
If you want to break up your space without breaking the bank, I highly suggest looking at a wooden room divider as a building project rather than a furniture purchase. You will save hundreds of dollars, and you get to say, “I made that,” to everyone who walks into your living room.
Have you ever attempted a floating wall or divider like this? I would love to hear about your measurements and how you handled the ceiling issue. Drop a comment below or save this idea to your Pinterest board for your next weekend project.
Leave a Comment