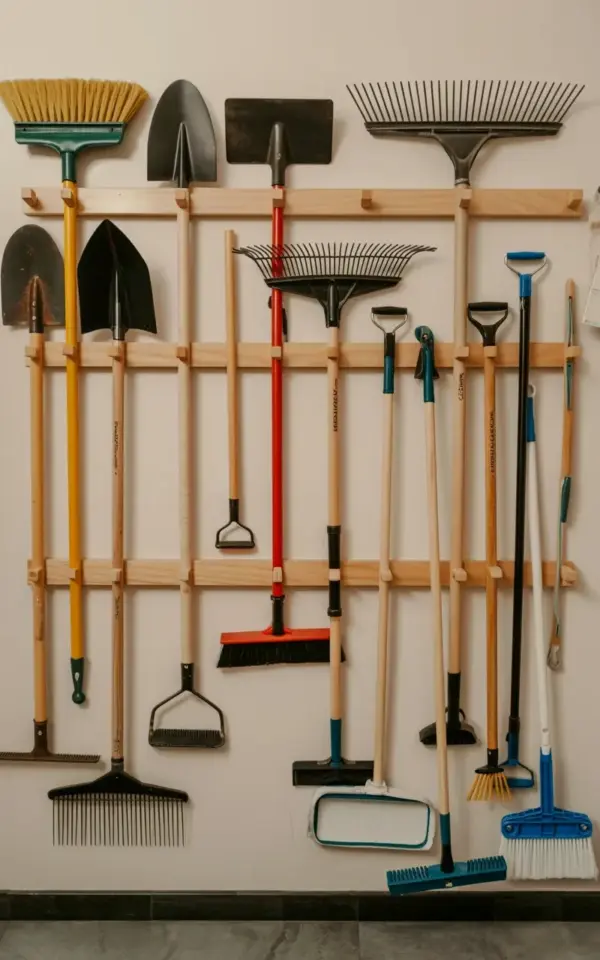
I finally got around to tackling my garage chaos last weekend, and honestly? This wall mounted garden tool storage system changed everything. The photo shows exactly what I mean: a row of wooden pegs on a light beige wall holding a yellow broom, a red-handled spade, several metal shovels with black handles, rakes, and even a black push broom. It looks so simple, but turning a blank wall into a cleaning station like that? Pure genius. Not gonna lie, I used to just lean all my tools in a corner and watch them fall over every time I opened the door. Now everything stays put, and it makes tidying up so much easier. Let me walk you through exactly how I built mine, what I learned, and why you should do it too.
Why I Chose Wooden Pegs Over a Fancy Broom Hanger Rack
Look, I tried those metal broom hanger clips before. You know the ones with the spring-loaded arms? They always snapped off after a few months, or the broom handle slipped right out. Not great. So when I decided to build this wall mounted tool organizer, I went with simple wooden pegs instead. Here’s the thing: wooden pegs are forgiving. You can space them however you want, they don’t rust, and they hold everything from a skinny rake handle to a chunky shovel grip. The set in the photo uses round dowels, but I used square ones from the hardware store. Both work fine. Just make sure the pegs are long enough (at least four inches) so the tools don’t wobble off.
One weird little detail I learned: sand the ends of the pegs a bit. Otherwise the first time you hang a shovel, the rough wood can scrape the paint off the handle. Not a huge deal, but it annoyed me. So I spent ten minutes with some fine-grit sandpaper, and now it’s smooth as butter. That’s the kind of practical thing nobody tells you.
Step by Step: How to Mount Your Own Broom and Shovel Organizer
Ok so here’s the exact process I followed. I’m not a carpenter. If I can do this in an afternoon, you can too. You’ll need a drill, a level, a tape measure, some wall anchors (if you’re going into drywall), and a piece of wood for the base. I used a 2×4 cut to 36 inches, painted it white to match the wall. But look at the photo again: that rack doesn’t even have a solid backboard. It’s just pegs screwed directly into the wall studs. That works too, but only if your studs are spaced perfectly for your tools. I wanted more flexibility, so I mounted a horizontal board first, then screwed the pegs into that board.
- Step one: Find the studs in your wall. Use a stud finder, or tap along the wall and listen for a solid thud. Mark them with a pencil.
- Step two: Cut your base board to length. I went with 36 inches because that’s enough for three shovels, a broom, a rake, and the push broom.
- Step three: Pre-drill holes through the board into the studs. Screw the board securely to the wall. Use lag bolts if you’re hanging heavy metal rakes.
- Step four: Arrange your tools on the floor in the order you want them. This matters more than you think. I put the yellow broom on the far left, then the rakes, then the shovels. The black push broom hangs lowest because it’s short.
- Step five: Mark where the peg holes should go. Hold each tool up against the board and see where the handle sits naturally. Drill holes at a slight upward angle (about 10 degrees) so the handles don’t slide off.
- Step six: Insert the pegs. I used a little wood glue in the holes for extra security, but you can skip it if you drill a tight fit.
The Best Tools to Keep Within Easy Reach
Not everything belongs on this rack. I tried hanging a heavy garden fork once, and it just pulled the peg right out. So here’s what I actually store on mine: the yellow broom (it’s cheap but it sweeps great), a wide push broom for the garage floor, two flat shovels (one for snow, one for dirt), a pointed spade for edging, and three rakes of different widths. The photo shows a similar setup, but I also added a small hand trowel in a little basket I hung below. Honestly, the key is to only keep the tools you use at least once a month on the pegs. The rest can go in a bucket or on a shelf. Otherwise you end up with a cluttered wall that looks messy again.
One thing I did differently from the photo: I painted the tips of my pegs bright orange. Why? Because I kept walking into them in the dark garage. That’s a real human problem, not a Pinterest problem. Painting them saved me from stubbing my shoulder every time I reached for the light switch.
How This System Keeps Your Cleaning Supplies in Check
Now, the rack in the photo doesn’t show much beyond tools, but I added a few extras underneath. I hung a small wire basket to hold spray bottles and a dustpan. I also screwed a magnetic strip onto the side of the base board for metal scraper blades and pliers. That turns the whole thing into a cleaning supply organization station, not just a tool rack. For the broom and shovel organizer itself, I keep a little hook near the bottom for a reusable grocery bag. That bag collects all the leaves I sweep up, so I can just grab it and dump it in the compost bin. It’s not part of the original design, but it works.
Another tip: if your garage is dusty like mine, put a small mat under the rack. Shovels and rakes drag in dirt from the garden. I use an old doormat, but you could also use a piece of plywood. Just something to catch the crumbles so you’re not sweeping the floor twice. Not gonna lie, I ignore the mat for weeks sometimes, but at least the dirt is contained.
Small Garage Tips: Maximizing Vertical Space
My garage is tiny. Like, barely room to park a sedan. So wall mounted storage solutions are a lifesaver. The photo shows a blank wall turned into an organized station, and that’s exactly what you need. Don’t just use the space above the tools, though. Use the space below them too. That’s where I put a narrow shelf for garden gloves, pruners, and a roll of trash bags. Everything is within arm’s reach. And because the shelf is only six inches deep, it doesn’t stick out into the walking path.
If you’re really tight on space, consider mounting the pegs on the back of a door. I haven’t done that myself, but a friend of mine attached a similar rack to the inside of his shed door. It’s like a secret organization panel. He uses shorter pegs, like three inches, for smaller tools. But for brooms and shovels, you need the full length. Just be careful opening the door if the tools stick out sideways.
One Thing I Wish I Had Done Differently
Ok so I love my wall mounted garden tool storage system, but I made one mistake. I didn’t leave enough room between the pegs for the shovel heads. The photo shows a nice orderly row, but in real life, the heads of my shovels overlap each other when they’re hanging. That means every time I grab one, I accidentally knock the other. I should have spaced the pegs about two inches wider apart. Live and learn. If you’re reading this before building yours, measure the widest part of each tool’s head and add an inch. Trust me.
Also, I used pegs that were too thick for a few rakes. The rake handles were skinny, so they slipped off. I wrapped them with a layer of electrical tape to make them thicker. Not the prettiest fix, but it works. Sometimes you just have to hack it, you know?
Anyway, this project took me one afternoon and cost less than twenty bucks. It keeps my brooms and shovels within easy reach, and it honestly makes cleaning up the garage less annoying. I grab the yellow broom, sweep the dust into a pile, and hang it back up in ten seconds flat. That’s the kind of win I’ll take. If you’re tired of leaning tools everywhere, give this a try. Start with a board, some pegs, and a drill. You can always adjust later. And hey, send me a photo when you’re done. I’d love to see your take on it.
#wallmountedtoolstorage #gardentoolorganization #garagestoragesolutions #cleaningsupplyorganization #diygarageideas
Leave a Comment