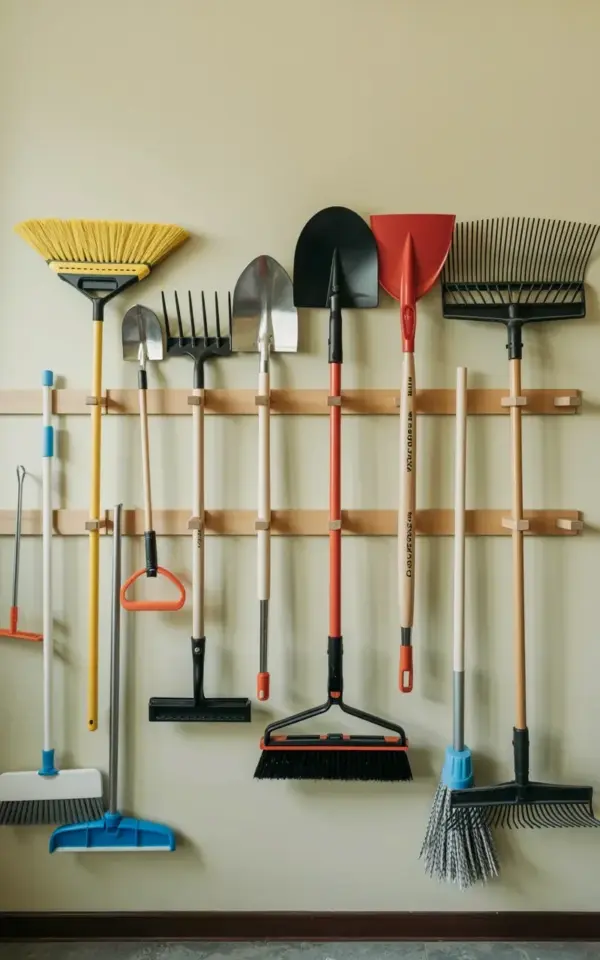
Look, I spent years tripping over my rake every single time I opened the garage door. It was a mess. Then I finally found a wall-mounted rack that actually works for spring garden tool storage, and honestly, it changed how I feel about my garage. The one in the photo here is almost exactly what I set up: a row of wooden pegs on a light beige wall, holding a yellow broom, metal shovels with black handles, a red-handled spade, a black push broom, and a couple of rakes with those metal tines. Everything hangs individually. No more pile of tools on the floor. No more awkward balancing acts. It just works.
Why Your Garage Floor Isn’t the Best Place for Rakes
Ok so, I get it. It’s easy to just lean tools against the wall after a long day of yard work. But here’s the thing: that habit creates a domino effect. One rake falls, you kick it, then you knock over the shovel, and suddenly you’ve got a tangled mess of handles and metal. It’s frustrating. And dangerous. I once stepped on a rake tine in sandals. Not fun.
When tools sit on the ground, they also get damaged. The handles get scuffed, the metal parts get dull from rubbing against concrete, and the broom bristles get crushed. A wall-mounted rack completely eliminates that. Your tools stay clean, sharp, and ready to go. Plus, you can actually park a car in the garage again. Novel concept, I know.
What to Look for in a Wall-Mounted Tool Rack (For Beginners)
If you’re new to this, don’t overthink it. You don’t need a fancy system with sliding rails or magnetic strips. The rack in the photo is beautifully simple: a wooden base with individual pegs. That’s it.
- Wooden pegs work great because they grip the tool handles without scratching them. Metal hooks can sometimes leave marks.
- Spacing matters. Look for a rack that puts each peg far enough apart so you can slide a shovel in or out without bumping the tool next to it. The one in the photo has maybe five inches between pegs. That’s ideal.
- Weight capacity is something to check. A heavy push broom plus a metal shovel adds up. Make sure the rack is anchored into studs, not just drywall. (I learned that one the hard way.)
- Depth of the pegs should be enough to hold a thick handle securely, but not so long that the tools stick way out into the room. About three inches deep is perfect.
Not gonna lie, I spent an hour in the hardware store comparing rack designs. This basic peg style won, hands down.
How to Install a Wall Rack (Even If You’re Not Handy)
I am not a handy person. My last DIY project involved a picture frame that ended up crooked for three months. But installing this rack? Simple. Here’s what you do.
First, find your wall studs using a stud finder. Mark them with a pencil. Hold the rack up against the wall, level it (use an actual level, not your eyeballs), and mark the screw holes. Drill pilot holes if needed, then screw it in. That’s it. The whole process took me maybe 20 minutes. And I’m slow.
One weird thing: the rack I bought came with screws that were slightly too short. I had to buy longer ones. Just check before you start. Also, if you have a concrete wall in your basement or a cinder block shed, you’ll need masonry anchors. But for a standard drywall garage, wood screws into studs are plenty.
Organizing Your Tools: A Simple System That Works
Once the rack is up, you need to decide what goes where. The photo shows a nice horizontal spread: yellow broom on the far left, then a red spade, then a black push broom, then a couple of shovels, then rakes. That’s a logical order. I’d tweak it slightly for my own use.
Put the tools you grab most often at the center, at eye level. For me, that’s the shovel and the rake. Less frequently used items like the push broom can live on the edges. And if you have a lot of tools, get two racks. Stack them vertically, one above the other. Leave about 18 inches between them so long-handled tools don’t hit the ceiling.
An odd personal detail: I keep a small bucket of sand at the bottom under the rack. I dip the metal shovel heads in it after use to prevent rust. It’s silly but it works. The rack in the photo has some cleaning supplies at the bottom too, which is smart. Use that space for a small broom and dustpan, or a spray bottle of lubricant for the pruners.
The Unexpected Benefits of Getting Tools Off the Floor
I figured the main benefit would be less clutter. And it is. But there are side effects I didn’t expect. First, I actually use my tools more often. When they’re hanging right there, visible and organized, I don’t go “ugh, I’ll have to dig them out.” I just grab and go. My spring garden tool storage system has genuinely made me a lazier gardener in a good way. Less friction means more weeding.
Second, my garage smells better. I know that sounds weird, but tools on the floor pick up dirt, moist soil, and sometimes oil. They get musty. Hanging them up lets air circulate around them. No more weird musty shovel odor.
Third, it’s safer for kids and pets. I have a dog who loves to sniff everything. A rake on the floor with tines pointing up is an accident waiting to happen. On the wall, it’s harmless. Here’s the thing: you don’t realize how many near-misses you were having until you remove the hazard.
A Few Extra Tips for Spring Cleaning Your Workspace
Since we’re talking about spring cleaning, here’s a mini checklist to pair with your new rack. This is what I did the weekend I installed mine.
- Wipe down all tool handles with a damp rag. Remove dirt and sap. Let them dry completely before hanging.
- Sharpen your shovels and hoes. A dull blade makes yard work twice as hard. A simple file does the job.
- Check the broom bristles. If they’re bent or broken, replace the broom head. The yellow broom in the photo looks pristine, but mine had a few stragglers.
- Vacuum the floor area where the rack will go. I found three lost screws and a dead cricket. Gross but satisfying.
- Label the pegs if you share the garage with someone else. I used a Sharpie on masking tape. Not classy, but functional.
Also, consider the lighting. A dark corner of the garage makes it hard to see which tool is which. I added a clip-on LED light near my rack. Now I can find the red-handled spade instantly.
Choosing the Right Spot in Your Garage or Shed
Not every wall is a good candidate. You want the rack in a spot that’s easy to reach but not in the way of car doors or shelves. I mounted mine near the side door, so I can grab a rake on my way out to the garden without walking through the whole garage.
If you have a shed, the same logic applies. Mount it on the wall opposite the door, so you walk in and see all your tools immediately. Avoid placing it above a workbench where you might hit your head on a broom handle. Trust me on that one. I have a bump to prove it.
For a smaller space, you can even use a short rack like the one in the photo. It holds six or seven tools, which is probably enough for most homeowners. If you need more, just buy another rack and mount it next to the first. They can be installed side by side with a gap of a few inches. Looks clean.
So there you have it. A wall-mounted rack with wooden pegs solved my garage chaos. It’s cheap, easy to install, and makes spring cleaning actually enjoyable. I no longer dread opening the garage door. Instead, I see a neat row of tools, ready to work. Try it this weekend. Your shovels and rakes will thank you. And your floor will finally be free.
#springcleaning #garageorganization #toolstorage #gardentools #wallmounted
Leave a Comment