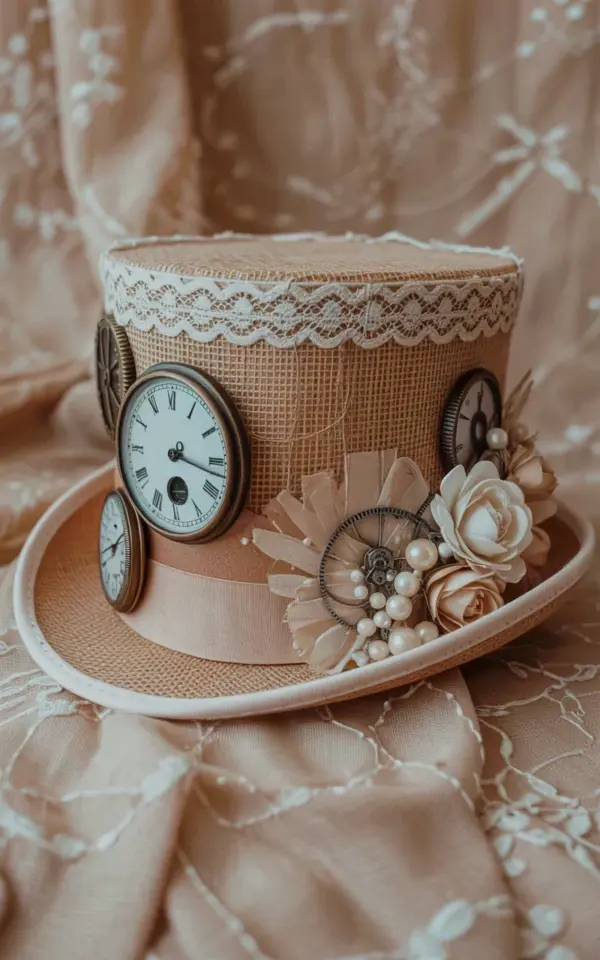
If you love the look of Victorian machinery mixed with romantic details, a steampunk top hat is the perfect project to try. This style combines rough burlap, delicate lace, and real antique clock faces for a look that feels both old-world and industrial. I have seen many costume hats that try too hard, but this one keeps things simple. The hat in the photo uses beige burlap, white lace trim along the brim, and a pocket watch face on the side. Small metal gears and cream roses with pearl beads finish the design. It is the kind of hat you can wear to a party or set on a shelf as decor. Below I have gathered five distinct ideas for making your own version, each focusing on a different element of the build.
Choosing Your Base Hat and Materials for a Vintage Look
The foundation of any great steampunk hat is the base itself. You can start with a plain black top hat from a craft store, but for a more textured feel, look for one covered in felt or paperboard. I prefer hats that already have a flat brim so the lace and gears sit evenly. For the photo example, the hat is covered in burlap, which gives it that warm beige tone. You will also need white lace trim (about half an inch wide works well), a hot glue gun, and fabric scissors.
Here are a few material ideas to consider for your own project:
- Burlap fabric – buy a yard of natural beige burlap from a fabric store or even a dollar store table runner.
- White lace trim – cotton lace with scalloped edges looks more authentic than synthetic.
- Antique pocket watch faces – you can find cheap broken watches at flea markets or online resale shops.
- Metal gears – small brass or silver gears from craft stores, or salvage them from old clock mechanisms.
- Cream roses and pearl beads – fabric roses from a florist section, and a strand of faux pearls.
I like to gather everything before I start so I can arrange the pieces and see how they look together. Trust your eye more than a strict plan.
Working with Burlap and White Lace for Texture Contrast
Burlap has a rough, woven texture that contrasts beautifully with soft white lace. To cover the hat, cut a piece of burlap large enough to wrap around the crown and brim. You can glue it directly onto the hat using a hot glue gun, working in small sections. Pull the burlap taut around the crown, then trim the excess around the brim edge. The photo shows the brim left mostly visible behind the lace, so you can leave the burlap only on the crown if you prefer a two-tone look.
For the white lace trim, glue it along the outer edge of the brim. Let it overlap slightly so the scalloped edge hangs off the rim. If your hat has a curved brim, cut tiny slits in the lace to help it curve smoothly. I also like to add a second layer of lace just above the brim line for extra Victorian detail. The key is to keep the glue hidden under the fabric so it looks sewn, not stuck.
One tip: use a low-temperature glue gun to avoid burning the burlap or melting synthetic lace. Burlap can get hot, so test a small spot first.
Adding Antique Pocket Watch Faces and Metal Gears for Clockwork Decor
The most eye-catching part of this hat is the clock face on the side. In the photo, a single antique pocket watch face is attached near the front left, with a few small gears clustered around it. You can also add a second smaller watch on the opposite side if you want balance. To attach a real watch face, remove the back and the inner mechanism, keeping only the face with its hands. Glue it flat onto the burlap using strong craft glue or hot glue. If the watch face has a metal rim, that adds even more industrial charm.
For the metal gears, arrange them in a small cluster near the watch. I like to stack a larger gear behind a smaller one for depth. You can also glue a gear directly onto the clock face, as if it is part of the mechanism. The gears in the photo are brass-colored, which picks up the warm tones of the burlap. If you cannot find real gears, look for plastic ones painted metallic – they work just as well when glued securely.
Try to place the gears so they look naturally scattered, not perfectly aligned. A little asymmetry makes it feel like a real clockwork piece that came together organically.
Creating the Cream Rose Floral Arrangement with Pearl Beads
The floral element softens the industrial look. In the photo, a cluster of cream and white roses sits on the side, right next to the clock face. To recreate this, pick up a small bunch of fabric roses in off-white or cream. Remove the stems and leaves, then snuggle the heads together. I glue them in a tight cluster, overlapping the petals slightly. Then I tuck a few pearl beads among the roses. You can use a strand of faux pearls and cut off individual beads, or buy loose pearl beads from a jewelry aisle.
Position the flowers so they partially cover the edge of the burlap and the lace, blending the two textures. Do not glue them on top of the clock face – let that remain visible. The pearls add a subtle shine that catches light, making the hat feel more elegant. If you prefer a darker palette, replace cream roses with deep burgundy or black ones. But the cream and white in the photo keep the hat from looking too heavy.
Assembling the Hat: A Step by Step Workflow
Now that you know the key material ideas, here is a simple assembly order that I have found works best. Start with the burlap covering – that is the base layer. Let it dry completely before adding lace. Next, glue the white lace trim along the brim. After the lace is set, attach the clock face and gears. Finally, add the rose cluster and pearls last so they sit on top of everything without disturbing the other elements.
If you are working on a top hat that has a brim and crown, remember that the brim is a good spot for the lace and small gears, while the crown is where the main watch and flowers go. The hat in the photo has the clock face on the side of the crown, just above the brim line. That placement draws the eye upward and balances the floral cluster.
One practical tip: before gluing anything permanently, lay all the pieces on the hat and take a photo. Step back and see if the arrangement feels balanced. Move things around until you are happy, then glue one piece at a time.
Styling Ideas: Wear It to a Costume Party or Display at Home
A burlap and lace top hat works for many settings beyond just a costume. Wear it to a Halloween party, a steampunk convention, or even a themed tea party. Pair it with a corset, a long skirt, and lace gloves for a full outfit. If you want a more casual look, wear it with a white blouse and dark jeans – the hat becomes a conversation piece on its own.
For home decor, place the hat on a tall bookshelf, a mantelpiece, or inside a glass dome. It looks great next to old books, glass bottles, or small mechanical gadgets. The clockwork elements give it an industrial museum feel. You could even make a set of two hats in different sizes and group them together. The cream roses and lace keep it from feeling cold or machine-like.
If you are making this as a gift, consider adding a matching brooch or a small gear necklace. The hat itself is fairly quick to assemble – about an hour of hands on time once you have everything ready.
Making a steampunk top hat with vintage lace and clock faces is easier than it looks. The mix of burlap, lace, watch parts, and flowers gives you plenty of room to customize. Whether you follow the exact look in the photo or add your own touches, this project is a satisfying way to spend an afternoon. Grab some supplies and see what you can create. I would love to hear which idea you try first.
#steampunkhat #diyproject #vintagehat #burlaphate #clockworkdecor
Leave a Comment