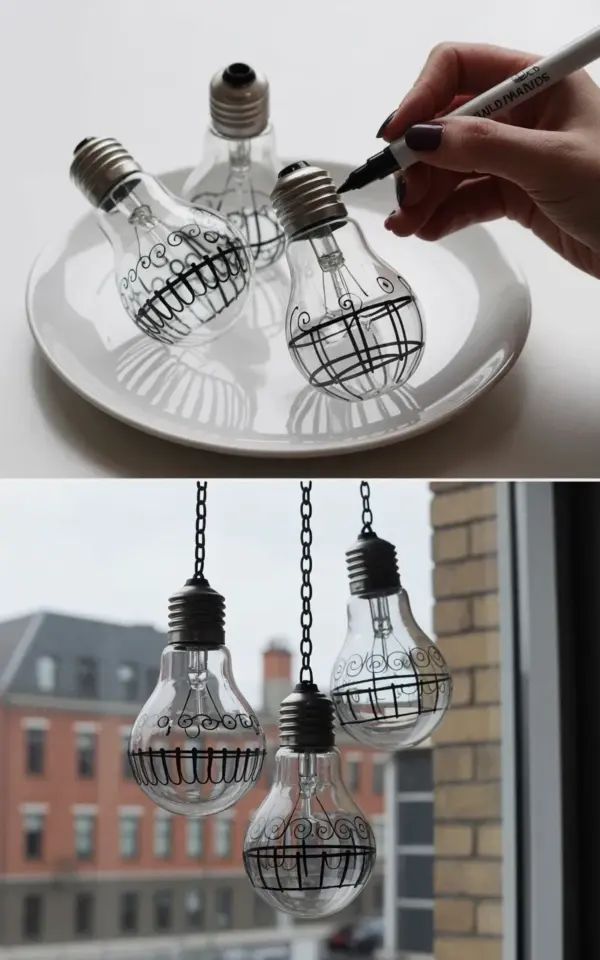
Look at that photo again for a second. You see the hand, dark polish, gripping a fine-tip marker, tracing a wireframe triangle onto the curve of a clear bulb. That’s it. That’s the whole project. No glitter. No ribbon. No tiny wooden beads pretending to be rustic. Just glass, ink, and a black chain. These hand-drawn light bulb ornaments are the most honest piece of DIY decor I’ve made for a minimalist bedroom decluttering project, and honestly, they took me twenty minutes once I stopped overthinking it.
The photo shows three bulbs resting on a white ceramic plate while you work. Then the same bulbs hang from black chains against a blurred urban backdrop. That contrast, clean glass against messy city light, is exactly what a minimalist bedroom should feel like. A few deliberate lines. No background noise.
Why Hand-Drawn Light Bulbs Fit a Minimalist Bedroom
A minimalist bedroom isn’t about owning nothing. It’s about owning less of the wrong stuff. Those empty filament bulbs you see at hardware stores? They’re practically begging to be drawn on, and they cost next to nothing. I found a pack of three for eight bucks at an electric supply shop, not even a craft store.
The geometric wireframe designs in the photo are a perfect match for the minimalist mindset. Sharp angles. Open space. The ink doesn’t fill the bulb, it outlines a structure. You can see right through the empty parts, which keeps the whole thing feeling light. That’s the opposite of clutter, both physically and visually. A cluttered bedroom makes your eyes work harder. These ornaments give your eyes a place to rest, because there’s literally nothing covering most of the glass.
Plus, the act of drawing on them forces you to slow down. Decluttering your bedroom can feel like a whirlwind of trash bags and decision fatigue. This little craft is meditative. You sit, you breathe, you make one smooth line at a time.
What You Actually Need for This Glass Bulb Craft
You don’t need a professional art studio for this. Here’s the honest list, based on what I actually used and what I wish I’d used the first time:
– Clear glass bulbs, the hollow kind with the little screw base. Leftover old incandescent bulbs work too if you know how to remove the filament safely, but new empty ones are easier.
– A fine-tip permanent marker in black. Look for ones labeled “for glass” or “oil-based.” A regular dry-erase marker will smear the second you touch it.
– Rubbing alcohol and a lint-free cloth to wipe the glass clean before you start. Skin oil repels ink like crazy.
– A reference image for geometric patterns, or just a ruler and a wild imagination.
– Black chains or thin black cord for hanging. The photo shows chains, which give it a slightly industrial look.
– That’s it. No glue, no stencils, no fancy tools.
Here’s the thing about the marker. I tried a cheap dollar-store permanent marker first and it bled like a paper cut. It left those weird pooling spots where the ink gathered thicker at the end of each stroke. Spend the extra two dollars on a proper paint marker with a fine tip. Your hand will thank you.
A Step-by-Step Guide to Drawing on Glass (Without Losing Your Mind)
Clean the bulbs first. Wipe them down with rubbing alcohol and let them dry completely. Even a tiny fingerprint will mess up your line work. I learned that the hard way when one of my swirls suddenly had a little oily gap in the middle.
Now rest the bulb on a white ceramic plate like the one in the photo. That’s not just for aesthetics. The white background makes it easier to see what your marker is doing against the clear glass. You’ll thank yourself when you’re drawing those thin wireframe edges.
Start with simple shapes. A triangle. A hexagon. The photo shows a wireframe design, which basically means you’re drawing the edges of a 3D shape as if it were made of wire. So draw a hexagon, then connect the corners with diagonal lines. Don’t try to be perfect. The hand in the photo has dark nail polish and is holding a marker with real confidence, but that confidence comes from repetition, not talent.
Work in layers. Draw the outer shape first, let it dry for thirty seconds, then add the inner lines. If you want decorative swirls like they have in the bottom bulb, draw them with a continuous, slow curve. One stroke. No stopping. A jerky hand gives you wobbly messes.
The Bedroom Decluttering Trick Behind Hanging These Bulbs
Here’s the part that makes this a bedroom decluttering project instead of just a random craft. You’re not adding more stuff to your room. You’re replacing visual noise with visual silence. When you clear off a nightstand or a dresser, you’re left with empty space. That space feels good for about a day, and then it feels dull. Hanging these bulbs fills the vertical space, not the flat surface. That’s the trick.
Your surfaces stay clean. Your walls or ceiling get a delicate focal point. The bulbs in the photo hang from black chains against a blurred urban backdrop, which means they draw your eye upward. In a bedroom, that’s exactly what you want. You glance up, you see these light, airy shapes, and your brain registers calm. No clutter.
Also, the act of making something by hand helps you let go of other things. There’s a weird psychological effect. Once I spent twenty minutes drawing one bulb, I felt like I could finally donate the pile of old t-shirts I’d been ignoring for months. The craft primes your brain for decluttering. It’s a tiny win that gives you momentum.
Styling Your DIY Decor So It Doesn’t Feel Like Clutter
You can ruin the whole minimalist effect by hanging these bulbs too close together or adding a bunch of other decorations around them. Keep the spacing generous. In the photo, the three bulbs hang at slightly different heights, and that staggered look works because each one gets its own breathing room.
Use thin black chains, not thick ropes or colorful cords. The chain should disappear into the background. You want the bulb to feel like it’s floating. If you’re hanging them near a window, even better. The natural light will catch the glass and make your line work look sharper than it actually is.
Don’t put anything else on the same wall. No framed prints. No wall shelves. These bulbs are the single statement. If you have a plain white wall in your bedroom, that’s your canvas. The contrast between the empty wall and the hand-drawn patterns is what makes the whole thing work.
One more thing. Avoid using lights inside the bulbs unless you’ve done proper electrical work. These are decorations, not actual lamps. Trying to wire them up will just add cords and clutter, which defeats the entire purpose. Let them be empty. Let them be quiet.
Common Mistakes and How to Fix Them
I smudged my first bulb while I was drawing on the second one. The ink hadn’t completely dried on the first, and my hand brushed against it as I reached for my coffee. Total rookie move. Wait at least two minutes between finishing one bulb and starting the next. Or work on all three bulbs at once, doing the outer shapes first, then going back to add the interior lines. That gives everything time to set.
Another mistake is gripping the bulb too hard. You’ll see the marks under the glass the next day, not on the glass, but inside. That’s the oil from your hand spreading. Use a light touch and hold the bulb by the metal screw base whenever possible. The plate in the photo helps with this, because you can rest the bulb on its side and rotate it without touching the surface you’re drawing on.
If you mess up a line and want to start over, use rubbing alcohol and a cotton swab immediately. The longer the ink sits, the harder it gets to remove. And don’t panic if your geometric wireframe turns out a little lopsided. The hand-drawn look is the entire point. If you wanted perfect symmetry, you’d buy a vinyl decal at Target.
Not gonna lie, I also went through a phase where I wanted to add color. A tiny bit of gold marker here and there, maybe a red accent. That lasted one bulb, and then I wiped it off. Stick to black. The darkness of the ink against the clear glass is what gives these ornaments their clean, minimalist energy. Color adds noise.
Making This Part of Your Own Decluttering Ritual
So here’s the real outcome of this glass bulb craft. You end up with three beautiful ornaments, but you also end up with a cleaner bedroom. Because the project takes so little time and effort, there’s no excuse to put it off. You don’t need a craft room. You don’t need a weekend. You just need a few bulbs, a marker, and fifteen minutes of breathing room.
Start with your nightstand. Clear it off. Remove the old water bottle, the stack of receipts, the mystery remote control. Then hang one bulb above it. See how that single hand-drawn shape makes the empty space feel intentional instead of empty. That feeling is what a minimalist bedroom is really about. It’s not a lack of stuff. It’s a refusal to let stuff demand your attention.
I’d love to know how your bulbs turn out. Try the wireframe triangle first, or maybe a spiral if you’re feeling brave. Take a photo, hang them up, and let them do their quiet work. Your bedroom will feel lighter, and honestly, that’s the whole point.
Leave a Comment